Fan/Light Switch (LZW36) Suggestions and/or Improvements 2.0

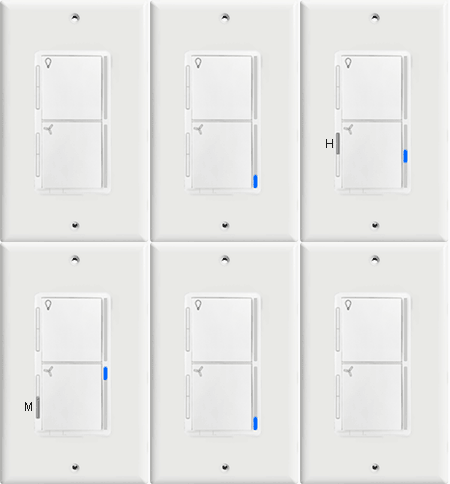
+1 fhoffer: Single LED Status Indicator for Fan Speed and Dimmer Level
LZW36_SingleLED

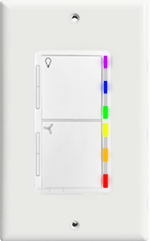
I would like to see a LED Strip Effect called ‘Status’ where you can control the LEDs individually. With the way the strip is, it might be difficult to differentiate the individual LEDs so I would make odd LEDs controllable and even LEDs off (to create a gap).
LZW36_MultiColorNotification

I would also like to see the ‘Instant On’ feature that exists on the LZW30 come to this switch. The multi-tap capabilities drive the WAF way down on this switch. Being able to remove the 700ms delay would make speed adjustment much more intuitive. Perhaps independent ‘Instant On’ for up/down buttons? Then you could have some scene control and still be able to adjust speed quickly.

+1 jtronicus: Air gap kills power to canopy (Load & Neutral)

Great product, Thanks!!!

5 Likes

Hi @ledhed, you probably saw already, but EricM has released a version of the LZW36 firmware that adds the setting to skip the 700ms delay (same as all the other dimmer/switches) - Menu, Support, Knowledge Base, Downloads, Firmware v1.36 (but just for the main on/off)

1 Like

I would love this fan / dimmer, however EVERY new modern fan is DC and have anywhere from 3 to 6 speeds. I would LOVE to have a DC fan / dimmer switch from your team?

1 Like

Just wanted to +1 this- this is a great idea for both LZW36 and also Red series dimmer.

1 Like
  • Have a version for 3 wire (Without the canopy controller)
  • With the canopy, allow using the red wire as a traveler instead of RF
  • The air gap definitely needs to be able to kill power to the fan
1 Like

Did anyone mention adding a second white wire to the canopy module, to eliminate the confusion about the fan’s neutral wire needing to connect to the ceiling box???

Thanks for asking!

#1, I would like the light switch to be a full height rocker paddle, so that it matches the rest of the light switches in my house. This would also eliminate the need for the side up/down rocker by following these conventions:

  • Tap-top: on to previous setting
  • Hold-top: increase brightness
  • Tap-bottom: off
  • Hold-bottom:decrease brightness

The fan could be controlled with a horizontally mounted thin rocker along the bottom edge (rotate the fan’s up/down rocker by 90 degrees.) With four steps, off/low/medium/high, I wouldn’t need a separate paddle for the fan.

#2. The light dimming ramp needs to be modifiable, as it looks to vary between LED bulb manufacturers. The bulbs I use appear to be about the same brightness from 100% down to 50%/40% or so. From 40% to 20% they dim quickly, and below 20% the bulbs begin to flicker, then strobe wildly. So I have maybe a 20 step useful dimming range. If I could set that profile via parameters, the dimmer would be much more usable.

#2.5 Possibly related to #2, the switch seems very sluggish to respond when I tap the dimmer panel to shut it off. That might be because it’s ramping down slowly from 99% to 40% with no visible effect.

#3 The number of illuminated indicator LEDs along the right side may be trying to convey information to me, but it doesn’t. Currently, it’s a single translucent strip that’s lit from behind. When I touch the switch, it’s down near my belt-buckle; looking down I see a glow but have no idea if it’s nearly empty or full. To check, I would have to bend down and stare straight at it. If it was a set of discrete isolated lights along the right edge of the switch, I could at least see “3 of 5”, “2 of 4”, etc. As is, it’s difficult to use.

#4 An easier-to-remember way to put it in Z-wave pairing mode. Holding down the light paddle while closing the air-gap switch would be easy to remember, and much more in line with other manufacturers. The current scheme absolutely requires me referring to an instruction manual, which is not at all friendly in the field.

#5 Make the switch body a lot thinner! The main reason anyone would pay a premium for a combo switch (and not just add a second dedicated fan-only switch) is to fit an existing single gang box in a tight wall cavity. Any existing box already has three Romex cables coming in (14/2 line in, 14/2 line out, and 14/3 to fan) and is already crammed full of wires and wirenuts. There’s no room for this huge, empty, plastic body! It should be as thin as a mechanical toggle switch.
Lots of great feedback here, so to +1 on a few I saw:
+1 To provide an option for the wall switch to support older “dumb” two-switch installations (one dumb switch for the fan, one dumb switch for the light)
+1 Supporting the older two “dumb” switch option also means you can remove the canopy requirement since the fan is now controlled through hard-line rather than RF.
+1 Support reverse, both through canopy module and through the direct wall switch installation

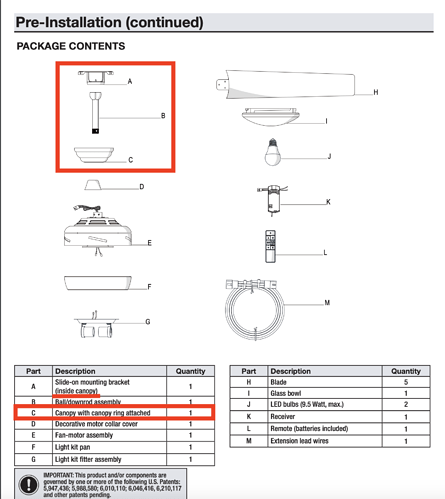
Not seen: Reviewing some posts from Home Depot, I saw them refer to the “canopy” as the fan housing that holds the motor & lights, while the fan “bracket” is the thing that connects the fan to the ceiling. Our downpipe extension is 10’, so its a big difference to install in the canopy (easy) vs the ceiling bracket (hard). Please make this clear in your instructions, where should we put the RF receiver?

From an actual fan’s instruction manual on the Home Depot web site:

https://images.homedepot-static.com/catalog/pdfImages/54/54b7d246-5cc9-4b53-8e6f-e63e5477a69d.pdf

It is clear to me what the difference is between the canopy and the motor assembly. Further down, this particular fan model even shows how to slip the factory-provided receiver (same size as Inovelli one) into mounting bracket A…

You should put the RF receiver as close to the switch as possible. It stands to reason that the closer the two are together, the better likelihood of a good switch to receiver RF connection. In your case, that means putting the Inovelli receiver in the fan’s motor assembly area if it will fit, which places it about 10 ft closer to your switch . . and as you’ve pointed out, a bit easier to install.

It’s not clear from the drawing how much room is in that assembly, so that may not be an option.

The typical wiring is on the canopy that meets the ceiling. That’s where the electrical wiring from the ceiling box meets the fan’s wiring, and when the RF receiver goes. In fans that come with their own RF receiver, this is generally where it goes.
Also this part does not vibrate as much as the motor’s housing.

Would love to see a version without the the RF module that works by directly wiring it to the fan and light. After ordering this I started the install only to find that when the house was built they actually pulled a 3-wire from the fan to the switch box and just capped it off. Why they did that who knows but was a pleasant surprise. So, a single gang switch just like this would have been perfect since I would have been able to wire the fan and the light directly to it. Also, that RF modules was way to big to fit in the canopy so I couldn’t use it at all.

That’s actually how it’s supposed to be done.

Since you have a 3-wire, it should be terminated switch side in a 2-gang box, or a box that has 2 slots dedicated to the fan. So right now you can use an Inovelli dimmer or switch for the light. Inovelli is presently working on fan switch as well.

If you’ve only got one slot available for both, then you’re going to need what you’ve suggested.

It is just a 2 gang box (other spot is a switched outlet) and was terminated at the fan and actually spliced in to the load side in the switch box. So the traveler wire was being switched on and off with the light. I did put in an Aqara double switch but it has none of the functionality to control the fan speed and feels like a cheap flimsy plastic toy. Would switch it out in a heartbeat if there was a better alternative.

1 Like

I would like to see a setting that allows for the notification lights to be turned off during select times.

For example I use the switch in my bedroom, where I like to sleep with the fan on. But at 2 am I really don’t want to full led lighting up my room. It would be nice to have the ability to say between 2200 and 0700 noticiation light off

I understand that this is a feature request, but you might be able to do this now.

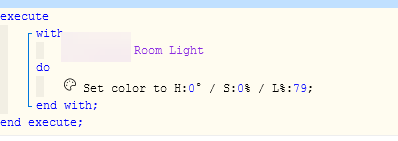
I don’t have a LZW36 to test, but see if the the Set Color HLS attribute is exposed to outside tools like webCore, Rule Engine, etc. You can set both the color AND the level with a rule. So in our case you’d have a rule run to turn it down or off and then back up in the morning.

This works with a dimmer, for example, just not sure about the fan switch.

1 Like

Ooo good call! I hadn’t thought of trying with webCore, I dare say I’m still new to it and haven’t full gotten the hang of it yet.

Sort of like this. The L value sets the illumination level. H and S are Hue and Saturation.

image

Also note saturation does nothing on ST/Webcore.

Good to know! Now to get the bulbs working right on it.